Where Is It? Describing Location in Pictures, Paintings and Photos
Core PathWay
1 Section 1. Start at the Edges — Basic Position Terms
Want to talk confidently about pictures, paintings, and photos? It starts with these words.
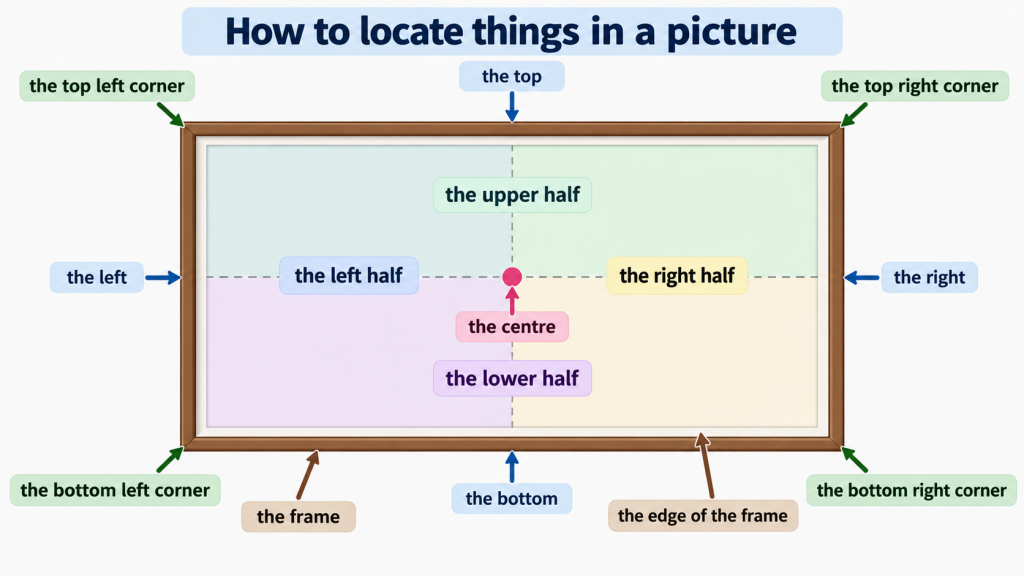
When we describe where something is in an image, we start with the most basic positions. We talk about the top, the bottom, the left, and the right. These four words are the foundation of everything else.
Look at this example: ‘There is a bird at the top of the painting.’ Or: ‘The signature is at the bottom of the photograph.’
We also use the left and the right to say which side something is on. For example: ‘The tree is on the left.’ Or: ‘The door is on the right.’
Notice that we usually say ‘at the top’, ‘at the bottom’, ‘on the left’, and ‘on the right’. The preposition changes depending on the word. Pay attention to this pattern.
One more useful term: the centre. This means the middle of the image — not left, not right, not top, not bottom. Just the middle. For example: ‘The main subject is in the centre of the photo.’
Finally, we talk about the frame. This is the outer edge of the image — the border that contains everything you can see. Knowing this word helps you describe what is inside the image and what is just outside it.
2 Section 2. Getting More Precise — Corners, Halves, and Off-Centre
Now let’s get more precise. We can combine ‘top’, ‘bottom’, ‘left’, and ‘right’ to describe the corners of an image.
The top left corner is the corner at the top on the left side. The top right corner is the corner at the top on the right side. The bottom left corner and the bottom right corner work the same way.
Here is an example: ‘There is a small figure in the bottom right corner of the painting.’ Or: ‘The artist’s name appears in the top left corner of the print.’
We can also divide an image into halves. The upper half means the top fifty percent of the image. The lower half means the bottom fifty percent. Similarly, the left half is the left side of the image, and the right half is the right side.
Two more useful terms: off-centre and dead centre. Dead centre means exactly in the middle — not slightly left or right, but perfectly central. Off-centre means not in the middle. The subject is placed to one side, which often creates a more interesting or dynamic image.
For example: ‘The subject is placed off-centre, which makes the photo feel more natural.’ Or: ‘The clock is positioned at dead centre, so your eye goes straight to it.’
Also useful: the edge of the frame. This means the very outer limit of what you can see in the image.
3 Section 3. Going Deeper — Foreground, Middle Ground, and Background
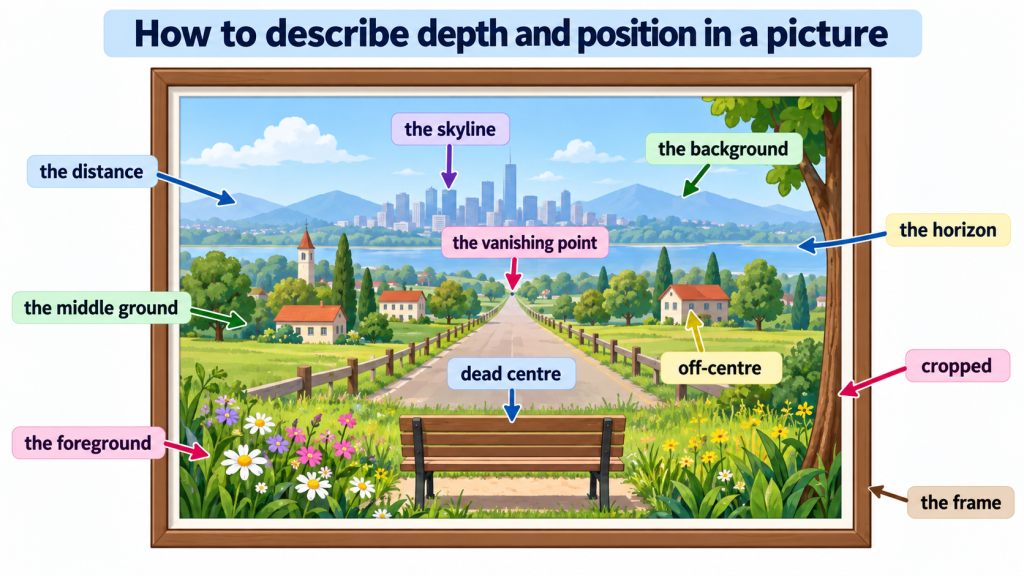
Pictures and paintings have depth. We describe this depth using three key terms: the foreground, the middle ground, and the background.
The foreground is the part of the image that appears closest to you — the part at the front. The background is the part that appears furthest away — the part at the back. The middle ground is the area between them.
Think of a landscape painting. There might be flowers in the foreground, a path in the middle ground, and mountains in the background. Each layer adds depth to the image.
Here is a model sentence: ‘In the foreground, you can see two figures walking. Behind them, in the middle ground, there is a river. The mountains in the background are covered in snow.’
We also use the distance to talk about things that appear very far away in an image. For example: ‘You can just make out a ship in the distance.’
A related term is the horizon. This is the line where the land or sea appears to meet the sky. It is usually somewhere in the middle or upper part of the image. For example: ‘The sun is setting just above the horizon.’
And then there is the skyline. This is the outline you can see against the sky — often the tops of buildings or hills. For example: ‘The city skyline is visible in the background.’
4 Section 4. Composition Terms — Cropped, Vanishing Point, and More
Some terms describe how the image is constructed or composed. These are useful when you are talking about photography or art in more detail.
First: cropped. When an image is cropped, part of it has been cut away. The photographer or artist has removed the edges to focus on a specific area. For example: ‘The photo is tightly cropped, so you can only see the subject’s face.’
Next: the vanishing point. This is a specific point in the image where parallel lines appear to meet in the distance. It creates the feeling of depth and perspective. You often see this in paintings of long roads or railway tracks. For example: ‘The road leads to the vanishing point at the centre of the painting.’
Now let’s revisit the frame in a more specific way. When we say something is ‘within the frame’, we mean it is visible in the image. When we say something is ‘outside the frame’ or ‘beyond the edge of the frame‘, we mean it cannot be seen.
These composition terms help you describe not just where things are, but how the image is put together. A photographer might place the subject in the upper half of the image, slightly off-centre, with a clear horizon line in the lower half. This kind of description shows real understanding of how images work.
Use these terms together to build richer, more precise descriptions.
5 Section 5. Putting It All Together — Describing a Full Image
Now you have all the vocabulary you need. Let’s see how these terms work together in a full description.
Here is a model description of an imaginary landscape painting:
‘The painting shows a wide countryside scene. In the foreground, there is a stone wall running from the bottom left corner to the bottom right corner. A farmer stands slightly off-centre in the lower half of the image, just behind the wall. In the middle ground, you can see green fields and a small village. The church tower is visible in the right half of the image. In the background, a range of hills rises towards the horizon. The skyline is soft and hazy. The whole scene is painted within a simple wooden frame, and the composition leads the eye towards the vanishing point in the top right corner.’
Notice how the description moves from front to back — from the foreground to the background. This is a natural and clear way to organise your description.
Also notice how corner terms, half terms, and depth terms all work together. You do not need to use every term every time. Choose the ones that are most useful for the image you are describing.
6 Section 6. Now Hear It in Use
You have met all the key terms. Now hear them working in a real conversation. Listen to how two speakers use this vocabulary naturally as they discuss a photograph together. Pay attention to how they combine position terms and depth terms to describe what they can see.
💬 Dialogue 1: What Can You See? Two Friends Discuss a Photograph
Clara and James are looking at an old black-and-white photograph that James found at a market. They are trying to identify the location and describe what they can see in the image.
Clara: “So where exactly did you find this? It's a beautiful photograph. What's that building in the background — can you make it out?”
James: “I found it at the market on Saturday — one of those old postcard stalls. I think that's a cathedral in the background, but it's quite far in the distance. Look — you can just see the towers above the skyline.”
Clara: “Yes, I see them now — just poking up above the skyline. And there are two figures in the foreground, on the left. Are they looking at the camera?”
James: “No, I don't think so. They seem to be looking away, maybe towards the cathedral. And they're not quite centred — they're a bit off-centre, actually, which makes the composition feel more natural. The photographer knew what they were doing.”
Clara: “You're right — they are off-centre, slightly to the left. And look at the bottom left corner — is that a market stall or some kind of cart? It's a bit hard to tell.”
James: “I think it's a cart, yes. And there's something else in the middle ground — between the figures in the foreground and the cathedral in the background. It looks like a wide open square, or maybe a park.”
Clara: “Yes! The middle ground is quite empty, isn't it? That's what gives it such a calm feeling. And look at the horizon — it's very low. So most of the image is actually sky.”
James: “Exactly — the horizon sits quite low, so the sky takes up maybe two thirds of the whole image. And look at the top right corner — there's a dark cloud forming. It gives the whole scene a slightly dramatic mood.”
Clara: “Oh yes, I see that cloud now — right in the top right corner. It's quite striking. And the light seems to be coming from the left, doesn't it? You can see shadows falling to the right across the middle ground.”
James: “Good spot. The light really does come from the left — you can see it on the figures in the foreground too. I also love how the edge of the frame cuts off part of that cart in the bottom left corner. It feels very deliberate.”
Clara: “Yes — the edge of the frame cuts it off just enough to make you curious about what else is there. I wonder if the photographer was standing in a doorway or something. The whole image has such a strong sense of depth — foreground, middle ground, background, all very clear.”
James: “That's exactly what I thought when I saw it. It almost feels like a painting. I have no idea where it was taken, but I'd love to find out. Maybe that cathedral in the distance is a clue.”
Member-Exclusive Practice Bar
Access a wide range of integrated practice for this unit — from Vocabulary and Grammar activities to AI-curated Writing tasks and Thematic Chat practice.
This feature is available to YSP members.
Explore Membership BenefitsMember-Exclusive Vocabulary Review & Acquisition System

This isn’t a simple quiz — it’s a fully tracked learning system. You build knowledge through recognition, then recall, and your progress feeds directly into the Integrated Practice Bar (Writing tasks, AI Chat, and more).
- Practice sessions, accuracy, and response-time tracking
- Term strength levels (Learning → Stable → Strong)
- Personal progress history for each unit
This feature is available to YSP members.
Explore Membership Benefits